A mirror-polished sculpture should do more than catch the light. Its reflections should move smoothly with the shape, bringing the surrounding architecture, sky and people into the work. A surface can look bright from a distance yet reveal a stepped seam, a shallow dent or a patch of uneven sanding when you move closer.
We wrote this guide for artists, designers and project teams reviewing stainless steel sculpture before shipment, often through photographs and video. We start with a simple straight-line test, then look at seams, surface clarity and the details that need closer attention. For materials, fabrication stages and project examples, see our mirror stainless steel sculpture fabrication page.
The quick test: follow a straight line
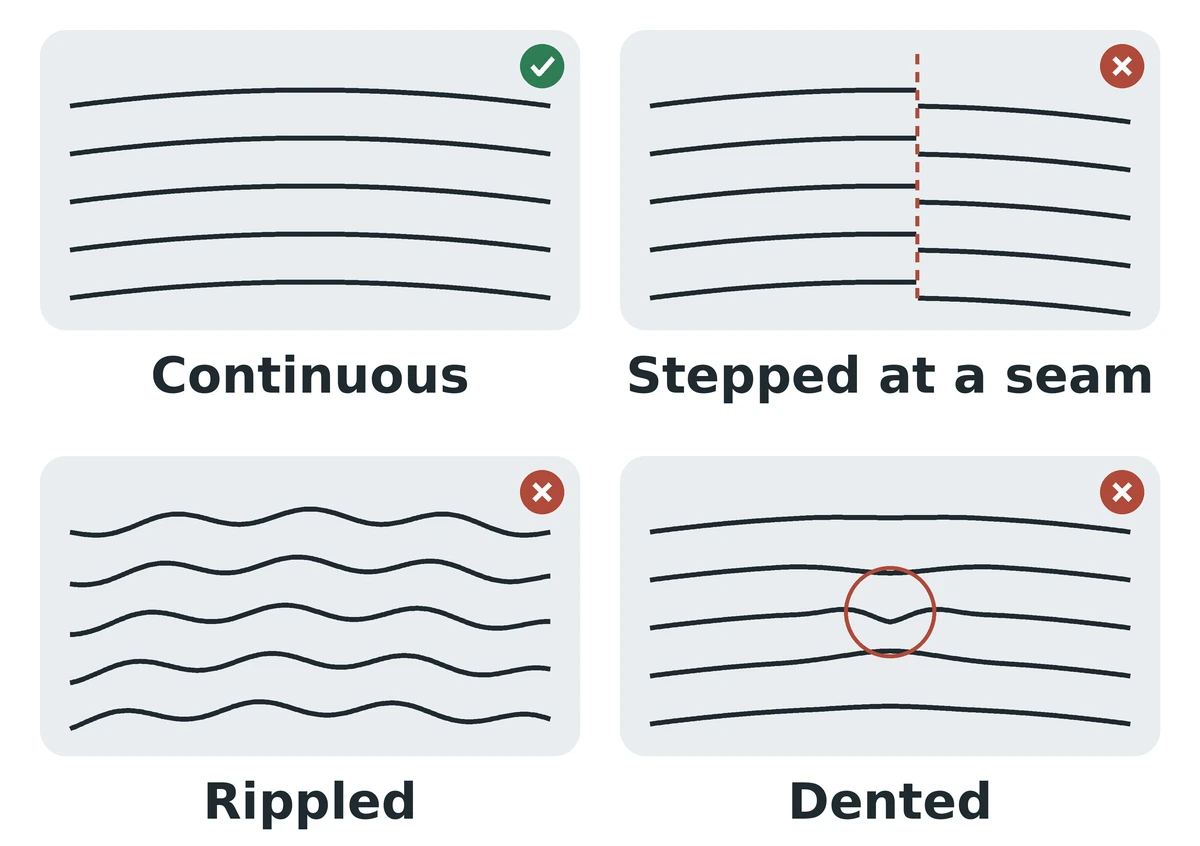
We begin with something straight near the sculpture: a roof edge, window frame or doorway. You can also hold a long straightedge nearby so that it appears in the reflection. Move slowly from side to side and watch the reflected line travel across the surface. On a curved sculpture, the line will bend. What matters is whether that bend follows the intended form smoothly.
The diagram shows four patterns to look for:
- Continuous: the line curves gradually with the form. Neighbouring lines follow a consistent flow without a sudden jump.
- Stepped at a seam: the reflection shifts abruptly where panels meet. Check the alignment and the blending of the welded joint.
- Rippled: repeated waves interrupt an otherwise smooth curve. Look closely for panel distortion or uneven grinding and sanding.
- Dented: a small area pinches the reflection inward. Follow the lines around it to locate the depression.
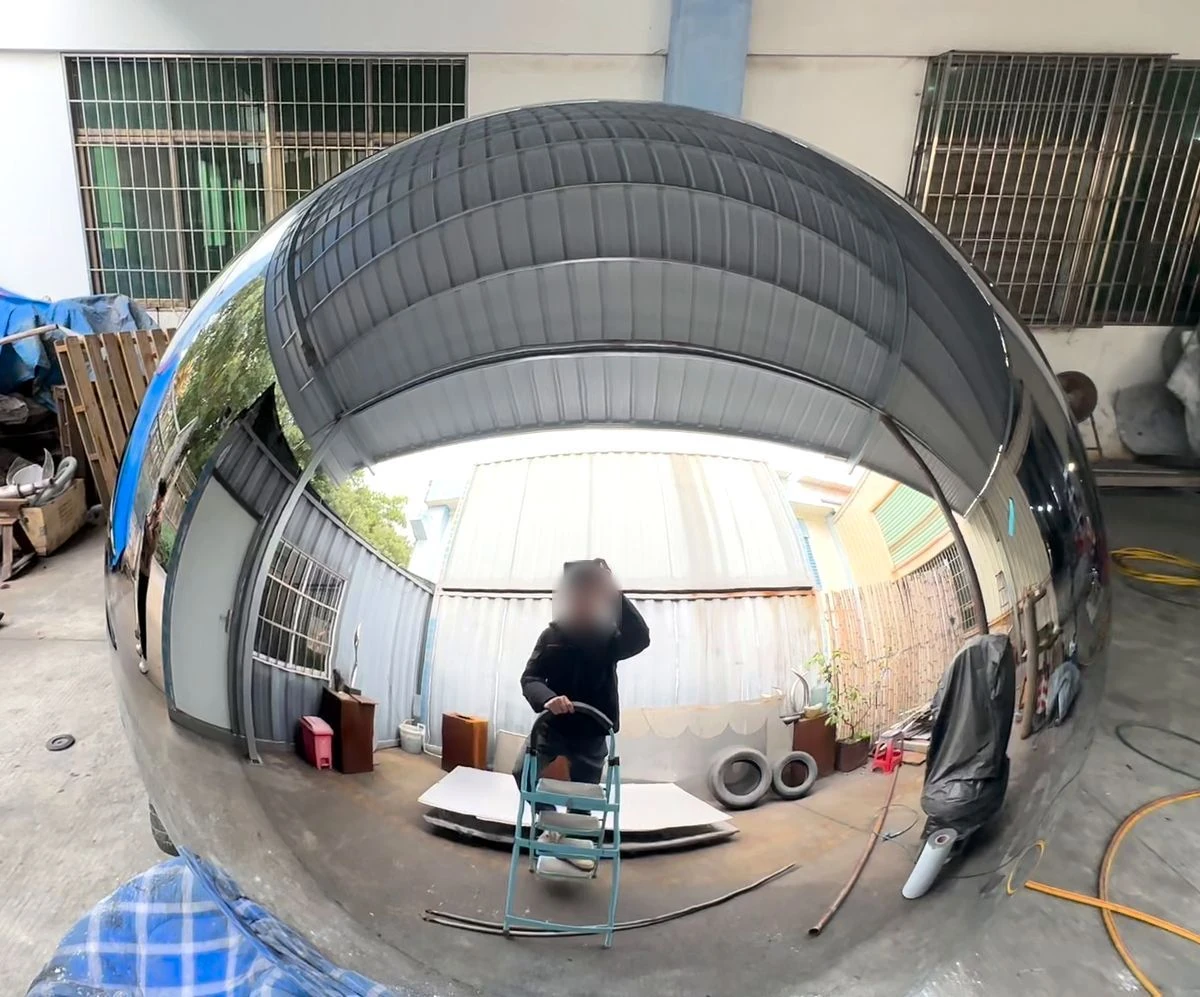
Repeat the check at different heights and viewing angles. An intentional crease or change in curvature belongs to the design; an isolated kink on a smooth area deserves closer inspection. We find that a clear architectural line gives the eye a more useful reference than a bright highlight. The sphere below shows how the workshop roof and walls bend across a rounded surface.
Five things to check up close
Seams
In our workshop, every seam is fully welded (no spot welds) and polished until it disappears into the surface. When reviewing a joint, we follow both the seam itself and a reflected line crossing it. Look for a ridge, a narrow groove, a dark line or a change in colour. Check for tiny holes along the weld as well. A joint can be smooth to the touch while its reflection still reveals a change in shape.
Ripples and flat spots
Move through several viewing angles instead of judging the surface from one fixed position. Repeated waves or an unexpectedly flat patch can reveal a shape that was not corrected before polishing. We compare the reflection with the intended curve: a rounded form should change gradually, while a designed flat face should read as flat. Pay particular attention to broad areas beside seams, where an uneven transition can become obvious in a moving reflection.
Dents and pits
Watch the edges of reflected lines for a small pinch, hook or interruption. A shallow dent changes the local shape; a pit appears as a small hole or dark point. Move the light or viewing angle to examine the area more closely. Pits can retain polishing compound and dirt, so a surface that looks clean at first glance still needs close inspection. We recommend checking these details before agreeing that the finish is complete.
Polish grade and haze
Our standard is mirror polished to 8K or higher. Look for clear reflected details as well as overall brightness. Haze, grey patches and circular sanding marks can indicate that the finishing sequence is incomplete. Compare adjacent areas under the same light, including those around welds. If a patch appears cloudy, ask for a clean close view so that surface residue can be distinguished from sanding marks that still need to be removed.
Edges, openings and transitions
We also follow the reflection into openings, around rims and through changes in curvature. These areas should receive the same attention as the broad front surface. A smooth face can be let down by a rough inner edge or an abrupt transition beside an opening. Review each detail from the directions in which people will actually see the sculpture, including lower and side views, and compare its contour with the approved design.
Why polishing cannot fix a poor shape
The mirror effect starts before the final buffing stage. We first form the metal, fully weld the seams and grind the joints flush. Sanding then progresses through finer abrasives, removing the marks left by the previous stage. Several polishing passes bring the surface to 8K or higher. Making a distorted panel brighter does not make its reflection smoother.
During coarse sanding, circular tool marks are visible across the metal. These belong to the preparation stage. Each finer step must remove the earlier scratches before the next stage begins; otherwise the final surface can remain bright but hazy or show marks when viewed at an angle.
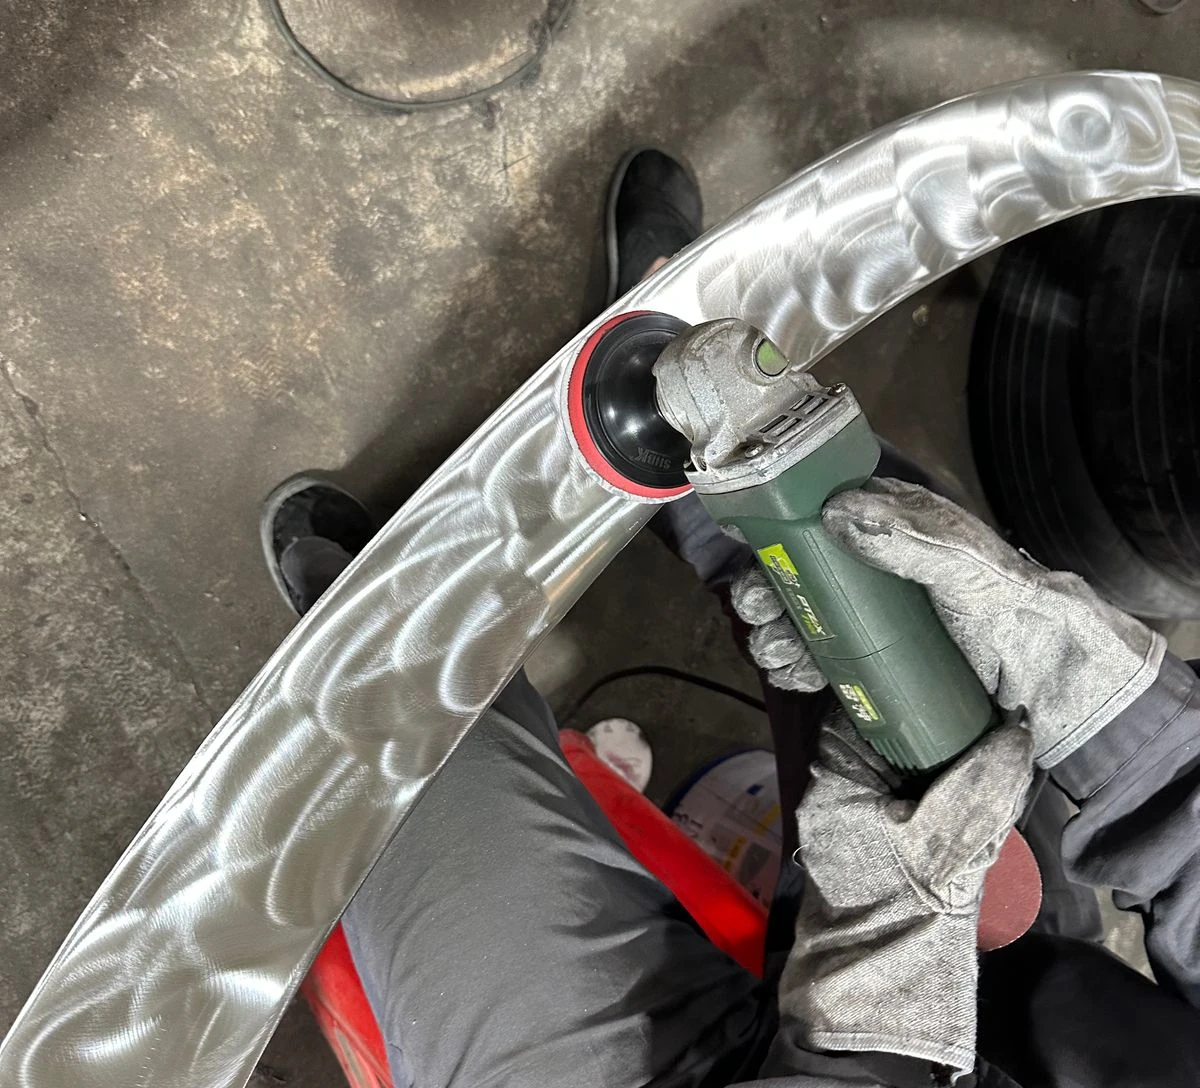
The band below makes the difference easy to see. The left side scatters light across its sanded surface. On the right, the mirror-polished area reflects its surroundings. It also shows why surface clarity and the underlying shape need separate checks.
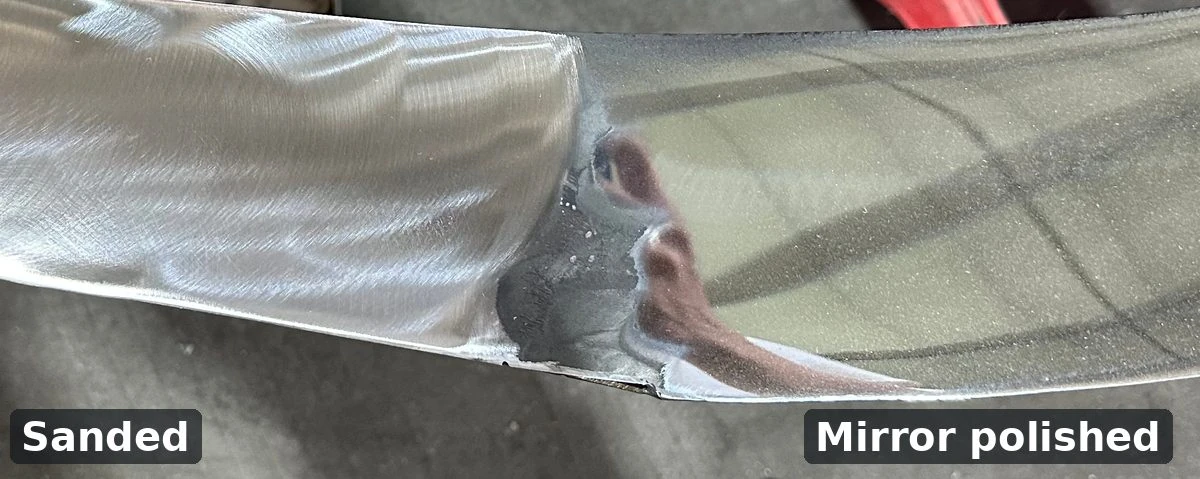
A dent or wave left in the form will still bend the reflection after polishing. We check the shape first, rather than expecting the finishing compound to hide it. Before packing, every mirror surface is checked by eye along its curves: reflections must run smoothly and continuously. Our mirror fabrication process explains how these stages fit into the wider project.
How to check a sculpture you cannot see in person
We suggest asking the fabricator for a consistent set of views before shipment. A single bright image can miss a problem that becomes obvious as the camera moves. Use the same approved design and finish sample throughout the review, and identify any areas that need another close look.
- A slow daylight walk-around video. Ask for a steady movement around the work, allowing reflections to travel across the form. Include both the overall sculpture and its transitions.
- Views with straight reference lines. Roof edges, door frames and building lines make changes in reflection easier to follow than an empty background.
- A close view of every seam. Ask for views along each joint and across it. Include inner openings and edges, not only the main face.
- A comparison with the approved finish sample. Place the sample beside the sculpture under the same lighting so that clarity and finish can be compared.
We make finish samples on request and agree them with you before production; that sample then becomes the reference for the project. A flat sample helps establish surface quality; the completed sculpture also needs the straight-line check to assess its curves. For a clear approval record, list the areas you have reviewed and any detail that needs correction or another view.
Does 304 or 316L change the mirror finish?
Both 304 and 316L can be polished to a mirror finish. The grade alone does not tell you whether a seam is well blended or a panel is smooth: those qualities come from forming, soudage, sanding and polishing. We assess the reflection separately from the material choice.
The difference becomes important in service. Compared with 304, 316L offers greater resistance to corrosion, particularly in environments exposed to moisture and salt. That helps preserve the appearance of outdoor and coastal work, alongside suitable cleaning and maintenance. A highly reflective finish is still worth caring for.
Our standard for mirror-polished work is 316L, indoors and outdoors; 304 is available on request for budget-sensitive projects. Include the installation environment when you send your brief so that the material and finish are discussed together. For a closer comparison of grade, finish and installation conditions, read our guide to choosing 304 or 316L for sculpture.
Keeping a mirror surface looking right
We recommend a soft, clean cloth with mild soapy water for routine cleaning. Rinse with clean water and dry the surface to avoid leaving water marks. Remove loose dirt before wiping, and use a clean part of the cloth as you work. Fingerprints and fresh water marks can usually be wiped away without an abrasive cleaner.
Avoid scouring pads, steel wool and chlorine-based or bleach cleaners. They can scratch or damage the finish. Light scratches can be repolished; for the next steps, see our guide to removing scratches from stainless steel sculpture. After any repair, check the reflection across the repaired area and the surrounding surface together.
Frequently asked questions
What does “8K” mirror polish mean?
8K is a trade description for a mirror-grade surface with clear reflections of lines and details. It is not, by itself, a certification. We use the agreed finish sample and the appearance of the completed surface to judge the result.
Why can a polished sculpture still look uneven?
Polishing adds brightness but cannot hide panel distortion, bosses, poorly blended weld transitions or unfinished sanding. Those issues need attention during the earlier forming and surface-preparation stages.
Can weld seams be completely invisible?
Oui. Full welding, grinding flush and polishing can make the seam disappear into the surface. We check it by following a straight reflected line across the joint and viewing it from several angles.
Can a damaged mirror surface be repaired?
Light scratches can be repolished. Our scratch-removal guide explains the approach. The repaired area should blend into the surrounding finish, with the reflection checked again afterwards.
How do I approve the finish before production?
Finish samples are available on request and approved before production. Review the sample under suitable lighting and agree on the surface appearance before the work proceeds.
Planning a mirror sculpture?
Send us your 3D model or drawings, dimensions, finish requirements and installation location. We can discuss the form and surface together. Explore our mirror sculpture fabrication approach and custom sculpture process, then share your project brief. For examples of different forms, explore our mirror sphere, concave mirror disc and mirror ribbon sculpture.
Related guides
- Choosing mirror, brushed or sandblasted finishes
- Emballage, shipping and installation
- Approving the sculpture model
Modern Art Sculpture is a brand of Xiamen Meibile Import And Export Co., Ltd. We fabricate in our own workshops for stainless steel, fiberglass and resin.